Showing posts with label garden. Show all posts

Saturday, June 29, 2013

Fence Succulent Garden


I love neon channel letters from old signs. I first saw bunches of them for sale at Farm Chicks in 2011, but didn’t know what I would spell or how to use them (and that was the year of everything wedding—the budget was occupied). It is a secret wish of mine to dedicate a full wall with a complete, mismatched channel letter alphabet, but alas that would require an available wall and a super good deal on letters. I saw them again last year with a plan in mind. I would buy the letters for “garden,” plant succulents in them, and hang them on our back fence. I bought the letters, but didn’t get everything planted that summer. Turns out I’m a slow mover. Determined to do better this year, I actually finished the project and am quite happy with the results.

I’ve been planting succulents in things (mostly old shoes) since I was in high school. I had one succulent shoe for about 15 years. Succulents are easy to grow (one of their best qualities) and are available in a variety of colors and shapes. Our back gets fence is full sun all the time, so it was the right spot for the fence garden. Succulents need well-draining soil, lots of sun, and little water.

Step one.

Find yourself some letters. I like the idea of spelling a common word, but initials or a family name could also be fun.

Step two.

Get those letters ready for planting.

The letters in their original state. 
Wash them. Scrub them. Remove any left over neon or clips. (I forgot to take a close-up “before” picture to show the insides in their full glory, but you can see from above that they were gross and needed stuff removed--the "a" still has all of its neon tubing).

I used pliers and wire cutters to remove the neon clips and the neon tubes. Then I used bleach water and a scrub brush to clean them and put silicone sealer around the seams where the bottoms of the letters meet the sides.

All cleaned up and ready to plant.
Two of my letters were rusty or had missing paint. To solve those problems, I repainted. The “r” needed a complete painting job; it was originally purple, and I chose to repaint in the same color. I liked the purple in the grouping. I also repainted the inside of the “d.” I taped the outside to protect the paint and used a khaki spray paint I found in the garage. That was a big step.

Step three.

Get the succulents ready.

Break apart tight clumps. I chose pretty standard Hens & Chicks for this; they’re not fancy, but they’re perennial. The roots should be 1 – 2” long. In doing research I read that the succulent cuttings should be allowed to dry out for a couple of days before replanting to encourage new rooting. I let some air out and others I just planted right away (which is what I’ve always done in the past). We’ll see how they last.

Step four.

Prepare for hanging. I used nails that fit into holes that were mostly already in the letters, placing them to line up so that when the letters are planted, I can just heft them up onto the nails. Note: make sure the fence is stable enough to hold the letters and nail into a cross bar on the fence, rather than just into fence boards. The boards won’t be strong enough on their own. When you like the arrangement (I forgot to take photos of this step, drat), take the letters down for planting.

Step five.

Plant, plant, plant.

Dirt.
Fill the letters with well-draining soil—sandy soil works well. Poke succulents into the dirt, packing them fairly close, but leaving a bit of room for more chicks to grow. 

Adding water to the d. 
Give them a bit of water for the roots to start taking hold. Leave the letters horizontal for a 1 – 2 weeks to allow the roots to take. (It would be a shame to hang them right away only to have all of the plants fall to the ground).

Finished!
Step six.

Hang your letters. Some of our succulents have gone craze and are blooming--they especially like the N. The letters were hanging for a few days before I planted them and we liked the look of the empty letters on the fence, but with the planting there is less contrast between the letters and the garden around them; they blend without losing their funk. They belong.  

Were have you planted succulents in unexpected places?


Monday, May 6, 2013

Garden Plans.

tomato and basil starts

Can you tell finals week is just around the corner? Blog posts have been set aside for grading papers, planning final class sessions, and wrapping up the semester’s work. The sunshine and garden have been distracting, and while I won’t have the time do everything I'd like for a few more weeks, I’ve been satisfying my urges by planning the garden and caring for seedlings.

Here’s what will be growing in our garden this year.
Perennials already doing their business:
Rosemary
Rhubarb
mint
Oregano
sage
chives
horseradish

Started from seed:
tomatoes:
Moscovich
German Johnson
German Lunchbox
Mortgage Lifter
Giant Pink Belgian
Big Rainbow
Heirloom Rainbow mix (these will be a surprise)
Amish Paste

Jalapenos
Greek Peperoncini
Italian Peperoncini
Banana Pepper
Cucumber           
Dill
Basil
Lemon Basil
Amish Pie Pumpkin
Sugar Pie Pumpkin

Cone Flower
Pinwheel Color Zinnia
White Zinnia

Direct Sow:
Peas
Purple Pole Beans
Soy beans
Danvers Carrots
lettuce mix
spinach
Garlic
parsley
cilantro
Sunflowers

Yet to purchase:
potatoes (Yukon gold and red)
onions (red and yellow)
Brussels sprouts
butternut squash
thyme

raised bed map, 2013

I do love planning the garden. It is calming during the stress of the term. Every year I make a quick drawing, planning out companion planting and crop rotations. I keep the plans in a file so I can refer to them while planning the next. This one already has some good dirt smudges on it--always a good sign of a well used garden plan. 

Our dirt is almost ready, and we have a new drip watering system (more on that later). I'm ready for a season of growing and harvesting as much as possible from our small yard. 

What are you planting this year? I’m always looking for new ideas.

Wednesday, April 24, 2013

Rhubarb Syrup


This week Ethan and I are weeding and adding compost to our garden spaces, planning the garden, and enjoying the sunny, cool evenings. In the last two weeks our rhubarb plants have gone from barely poking out of the ground to being nearly two feet in diameter. Spring, she is here. 

Before I go on, I have a confession: I am not the greatest rhubarb lover the world has seen. I prefer rhubarb mixed with other flavors. My dad will cut a stalk of rhubarb from the plant and take bites. Raw. Without sugar. I’m did not inherit that gene. I have come to appreciate rhubarb more as an adult, but I still like rhubarb mixed with another fruit or vegetables. Strawberry-rhubarb anything? Yes, please. Rhubarb chutney? Indeed. Rhubarb Jelly Barbeque sauce? Sounds great. 

I canned a lot of fruit syrups last year. I’ve become a fan of making drinks at home with club soda and homemade fruit syrups. I don’t drink a lot of soda, but I do enjoy one occasionally (especially in the summer). Flavoring my own made sense. No artificial anything or extra preservatives, just fruit, sugar, and carbonated water. (We have a soda maker now; I highly recommend one if you’re inclined to purchase club soda often. There is less waste and you can make the soda water as you need it. We love ours). 

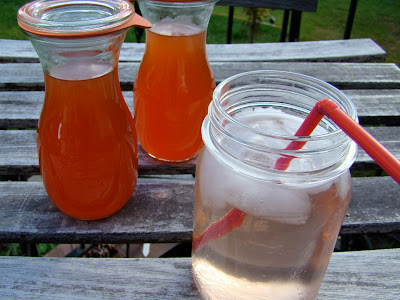
Rhubarb with citrus and vanilla was one of the syrups I canned last summer and am still using now. (I like to can syrups in Weck juice jars. They are easier to pour from and they’re pretty—I’m a sucker for pretty jars).

Making your own flavored syrups doesn’t require much effort, makes for a MUCH healthier drink, and opens up a world of creative flavors that are unmatched by processed canned sodas. Rhubarb syrup is delicious. Put this recipe on your rhubarb list when it’s ready for harvest. 

I based my recipe on several I researched, sticking to a simple ratio of rhubarb to sugar and adding my own supplementary flavors.

Rhubarb Syrup and a soda. Delicious.

Rhubarb Syrup with Citrus and Vanilla

makes approximately 4 cups

1 ½ pounds rhubarb, chopped
3 cups water
zest of 1 lemon
zest and juice of 1 orange
½ vanilla bean, scraped
2 ½ cups sugar

This recipe can easily be made and stored in the refrigerator for immediate use, but is also safe for canning, which is what I did. Refrigerator space is precious around here.

Combine the rhubarb, water, lemon zest, orange zest, and vanilla bean in a non-reactive pot and bring to a boil. 

Reduce heat and allow to simmer for about 10-15 minutes, or until the rhubarb is soft and has given most of its color.

Place a fine-mesh sieve over a bowl and strain the rhubarb juice—this should take about 30 minutes. Pressing the rhubarb in the sieve will make for cloudy syrup, so just let gravity to the job for you and take a break or get your canning pot ready while the juice drips through the sieve.

To can, fill your canning pot with your jars and cold water and bring to a boil. When the pot has reached a boil, turn the temperature down and simmer for 10 minutes or until you’re ready to fill the jars. Place the lids in a small saucepan and bring to a low simmer to soften the seal.

When the juice has strained, compost or discard the rhubarb solids and zest and place the juice back in the pot along with the juice of the orange (strained to remove pulp) and the sugar. Bring to a boil and simmer for 10-15 minutes until the syrup has thickened slightly.

Remove the jars from the canning pot. Fill with the syrup, leaving a full ½” headspace. Wipe rims, apply lids, and screw on bands. Process in a boiling water canner for 10 minutes (15 minutes for Spokane due to elevation).

When the time is up, pull the canning pot off of the heat and let sit for 5 minutes, then remove the jars and allow them to cool on a towel-lined countertop. Check the seals and store in a cool, dark place.

To make soda:
Add approximately 2 tablespoons syrup to a glass of ice, top with club soda, stir, and drink. It really is surprising and refreshing. I’ve also combined the rhubarb with strawberry syrup or Satsuma syrup. The combinations are great. I don’t ever use much more than 2 tablespoons of syrup, but it is easy to adjust for taste. 

Related Posts Plugin for WordPress, Blogger...