Friday, January 23, 2015

Making Purées for the Tiny Human


It turns out I REALLY like making food for the tiny human. There is something so exciting about developing food combinations for this person whose world is just now being opened to the joy that is food. My husband and I both love food, and in fact connect over food regularly. We cook for each other and occasionally together; we love eating out and finding the best local versions of our favorite meals. And so of course we were looking forward to introducing Charlie to the foods we love—perhaps too much. 

His first taste of food was mostly a disaster; it did not live up to my romantic ideal—one that we were celebrating. (There were a few friends over, and a half birthday hat involved).


We waited until Charlie was six months to give him solid food (this was our choice based on plenty of research and conversations with our doctor) and we wanted to start with a vegetable rather than something sweet. Again, there is intention here. Certainly every child is different (as are their parents). I’m not sure it will work, but if there is a chance, we’d like to raise an adventurous and mature eater, so we’re resisting adding fruit or sweet food to the majority of Charlie’s meals. His sweet tooth will have plenty of time to develop later.

Charlie turned six months old in November, so I though pumpkin would be the perfect fall food. I roasted and purée a sugar pumpkin my father grew in his garden (again, ideal) and was excited to feed him. He did NOT love it—or really any solid food for over a month.

I didn’t do the best job feeding him that first taste. I should have thinned the pumpkin so that is was more liquid than purée, and we should not have tried to put this brand new taste and texture anywhere near his mouth when he was tired. Whoops. 

He made faces.
He gagged.
He cried.
It was pretty funny, really, but I was disappointed. Of course he didn’t like the pumpkin—the entire concept of food was foreign to him and he had no idea what to do. Now I understand that.

While I can, I’m trying to make as much of Charlie’s food as possible. I like the idea of knowing exactly what he’s eating, and I just plain enjoy the creative process. We started with simple, single fruit and vegetable purées, and now that he has had several single foods (we're paying close attention to the foods he’s eating and looking for any sign of reaction), he’s ready for meals. 

A few weeks ago I had a marathon food making session; Charlie complied by playing in a laundry basket on the kitchen floor for a good part of the food frenzy.


I bought eight ingredients to cook, combine, blend, portion, and freeze.
My raw materials: spinach, potatoes, sweet potatoes, squash, pears, lentils, quinoa, and ground turkey.

My process:
I roasted squash in the oven.
I steamed spinach and pears.
I boiled both types of potato.
I cooked quinoa and lentils.
I browned turkey.
And used all of the pots and pans we own. 

Prepping quickly, cooking in two batches (we only have four burners on the stove), and washing dishes as I worked, it took about three and a half hours—not bad for food that will last several months. When cooking the food, I try to use as little water as possible for steaming and boiling, and I use the cooking liquid in the purées to maintain as many nutrients as possible. 


Once the ingredients were prepped and cooked, I portioned them into jars to blend with an immersion blender. Twenty-four ounce Ball jars worked perfectly—they’re big enough to hold a good amount of food and the blender fits all the way to the bottom of the jar. 


The immersion blender is fast, makes a fine purée, and the best part: it cleans quickly and easily between batches.


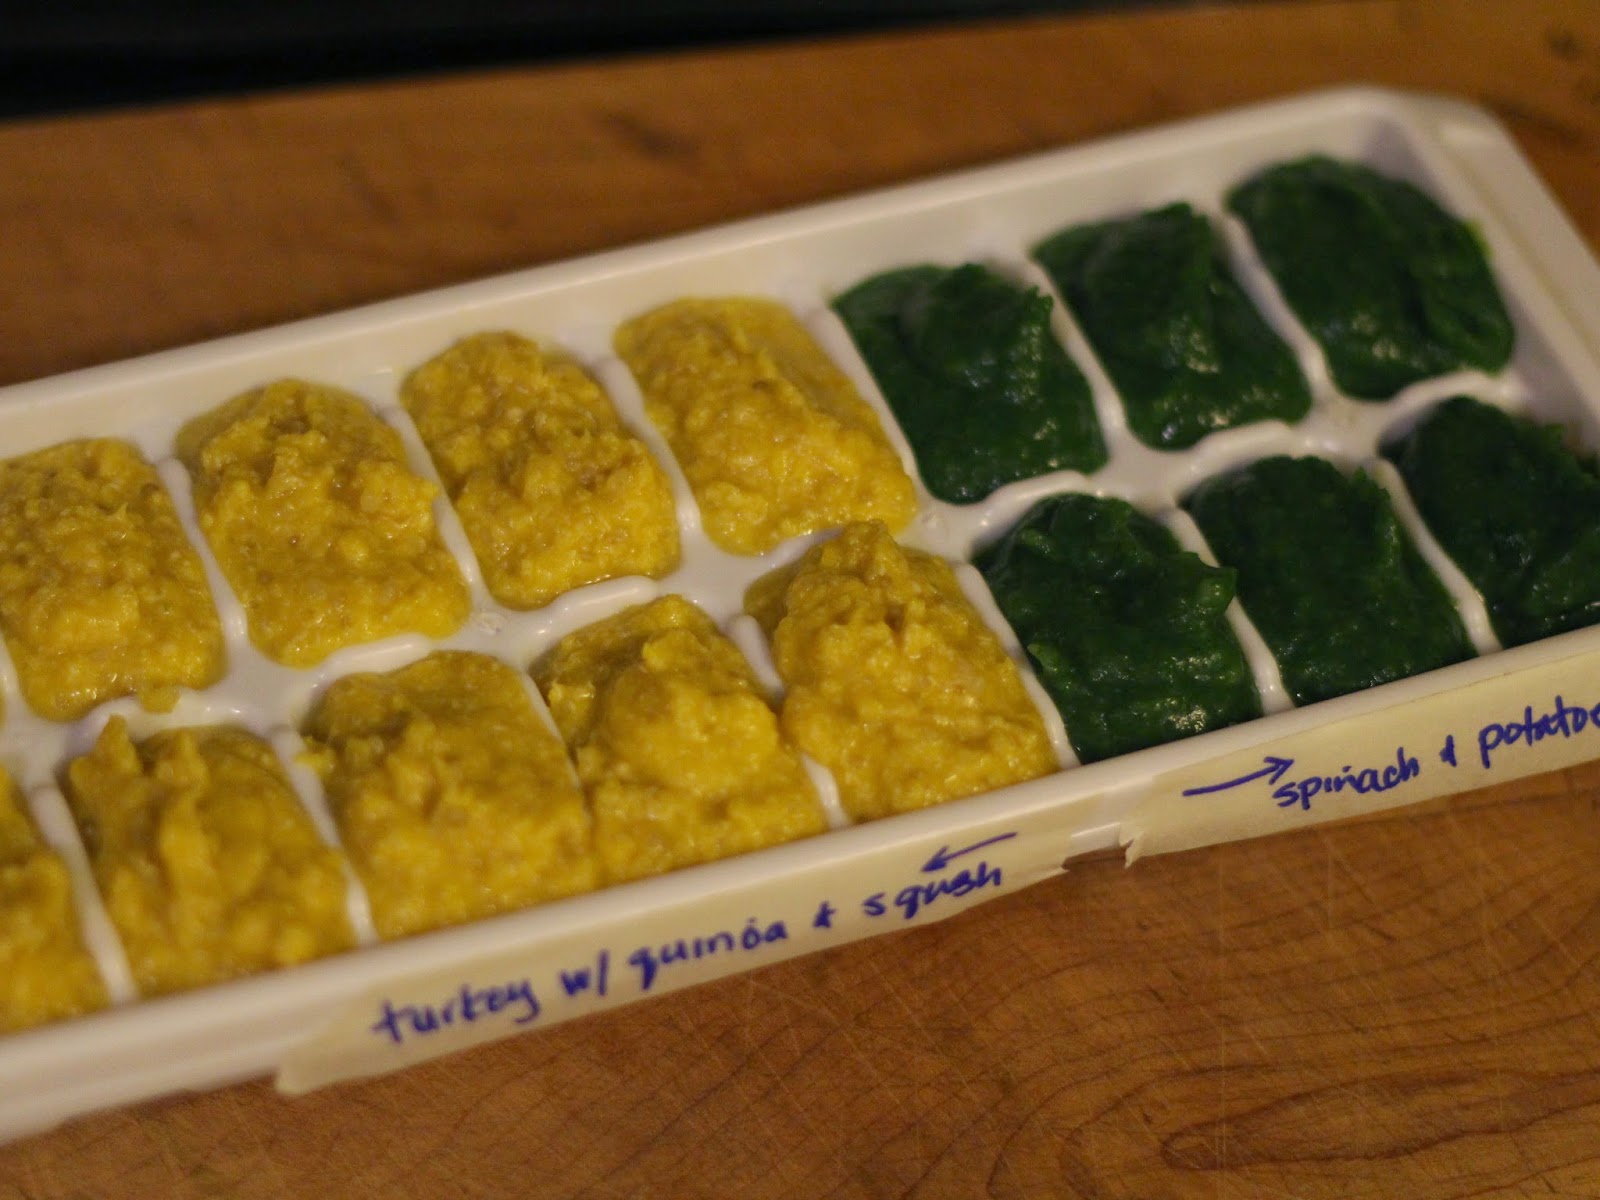
After blending I portioned the food into ice cube trays and labeled them (keeping track of the batches is simple, but important—Post-It labels on the jars and masking tape on the trays worked like a charm). Once the trays were frozen, I just popped the cubes into labeled  freezer bags. A shelf in our basement freezer is now dedicated to baby food ice cubes.


The child now loves food. For the last month he’s delighted in eating everything we give him--so much that he often says "mmmm" when taking a bite. I’m not sure how that happened really, but we were persistent and didn’t force him. For over a month he gagged and made faces with almost every bite we offered. Baby oatmeal and prunes he accepted after about a week, but everything else he refused (all of those first purées I made) and we offered every day. Eventually he ate one or two bites of his carrots, then pumpkin, and then he suddenly changed his mind about food in general and loved green beans, beets, sweet potatoes, and peas. He even sucked on a pickle without making a face. Somehow, our kid has turned into an eater, despite those first bites.

I made eleven purées that day:
Pears.
Pears with ginger.
Pears and sweet potato with cinnamon.
Lentils and squash.
Quinoa and squash.
Spinach and potatoes with cumin.
Spinach, potatoes, and turkey.
Turkey, quinoa, and squash.
Turkey, spinach, and quinoa with garlic.
Turkey, quinoa, and lentils with garlic.
Turkey, squash, and lentils.


 Beets. They're delicious.

 Which combinations of foods are favorites for the kids in your life?


Thursday, November 6, 2014

On the Needles, November 2014


I have been knitting for about five years. A friend gave me some needles and yarn for Christmas, taught me how to cast on, knit, and purl. The rest I learned by watching tutorials on youtube. The needles and stitches were familiar--my aunt had taught me when I was nine years old. I knit a doll blanket, then forgot the difference between a knit and a purl stitch. This time, knitting stuck.

Creating something useful (and beautiful and fun) satisfies something in my core. It still amazes me that by just tying knots in yarn, I can make clothing and fabric; I can keep people warm. I'm finally picking up my knitting needles again (pregnant exhaustion for much of the last year kept me from doing much knitting, or anything else). Currently, I have five projects on needles--two are relatively new, two have been there for quite awhile.


I started this blanket when I first began knitting five years ago. The pattern was free at JoAnn Fabrics, and I picked it up, thinking I had the skill to dive in--I almost did. I knit about half of the blanket, and was disappointed in my mistakes (LOTS of dropped stitches), and the pattern was too busy for me. So I ripped it all out and started over, spacing the white stripes further apart. I like it much better, but it isn't finished yet. Turns out I bore easily. I do like the colors and pattern and will get back to it. The blanket has become my between projects project.


My most recent project--Charlie's Christmas sweater vest from What to Knit When You're Expecting. I love this vest; the pattern is really easy and fast to knit (baby clothes are tiny!). And? I'm so close to finishing, he'll actually get to wear it! (I'm also counting this as my first sweater, even if it is pint-sized).


A scarf for my own neck! I loved the Noro Scarf from Brooklyn Tweed as soon as I saw it. I used a different, softer yarn, but stuck to the pattern as written. Easy. No curling. Super thick and warm. I made one for Ethan in different colors the first winter we were married, but didn't get mine finished...maybe this winter? It's really, really close to being done. The slow color progression created with two striping yarns is beautiful.


This pattern is my design! A Charlie Brown inspired bib for Charlie. Again, this one is very simple and almost finished. He's starting to eat solids this week...I better get crackin'.


I cast on the Stripe Study Shawl right before I found out I was pregnant, then promptly placed the project on pause. While knitting it did find the pattern to be fast and quite fun--I love watching it come to life. I'm knitting it in Rowan Cotton Glace in Blood Orange and Umber (Umber has been discontinued...let's hope I bought enough. There's a chance I'm a skein short, which I should *probably* check before I continue). The stripes are simple, but the asymmetry adds visual interest. The name of the pattern also makes me swoon--of course I want a shawl to wrap around myself while I study. Who wouldn't?

Do you have too many projects on knitting needles? Or do you finish one project dutifully before beginning the next (it's okay to be honest...I'll still like you).

Sunday, June 29, 2014

Homemade Laundry Soap


The subject matter of the first real post in nearly a year? Laundry. The most mundane subject I could think of for the occasion. (I actually thought about saving this post for later, then decided, meh, we all do it…maybe laundry will bring us all together! Let’s see, shall we?) After all, laundry is a part of all of our lives (with or without the recent addition of a tiny human who habitually wets himself).

Three people have asked me in the last couple of months about the laundry detergent I started making a couple of years ago. Before I chose a recipe, I researched MANY; there are hundreds to be found on the Interwebs and in books. One recipe of the mix I finally decided on lasted our household for almost two whole years (in the Age Before Charlie).


The measurements used need not be exact, just generally proportional—so go ahead and halve, double or triple the recipe. If you have a few tablespoons of baking soda left in the box, go ahead, throw caution to the wind and add it.


All of the ingredients can be found in the detergent aisle of most grocery or general stores—the castile soap included.


Laundry Soap
7 cups washing soda (a full 3 lbs 7 oz. box)
7 cups borax
2 cups baking soda
3 bars castile soap, grated (12-15 oz. total).

A note about castile soap: I’ve tried Fels Naptha and Kirk’s. Both work, but I like Fels Naptha better (for no good reason, really, both have the mildest of scents…I like Fels Naptha’s better). Fels Naptha is sold in a bigger bar than Kirks—I just use 3 bars no matter the brand as long as they aren’t vastly different.

Measure washing soda, borax, and baking soda into a storage container. Grate all three bars of soap with a cheese grater or the grating blade of a food processor and add. Mix all ingredients well with a plastic or metal spoon.

The making is done! This process really only takes 10 minutes. Totally worth it.

To use, just add one to two heaping tablespoons of detergent to each load of laundry, depending on the size of load. This recipe should last for 150+ loads of laundry and costs about 6 cents a load, which is far less than half the cost of most store-bought detergents. I spent less than $10 on supplies for TWO YEARS of laundry. Not bad.

Our clothes feel and smell clean and colors remain bright—which is all I am looking for in a detergent. If your house has older plumbing (like ours), you know that detergents that produce heavy suds can back up drains. Suds are also problematic for high efficiency washers. This detergent produces few suds and is gentle on plumbing, machines, clothing, and skin. There’s a lot to like about it.


I keep my detergent in a vintage All pail that my sister found at Farm Chicks one year. I'm sure it hasn't seen detergent for decades. There were no holes in the metal, but the bottom of the bucket was very rusty. I scraped the rust with a wire brush and painted it grey to keep my detergent from damaging the bucket further (and to keep the rust out of my clothes). It makes me happy that I’m repurposing to the original purpose; I think the bucket probably likes holding soap again. (Really the soap should be kept in a container with a lid, but I live on the edge).

Do make your own detergent? Likes? Dislikes? How do you feel about laundry?

Saturday, June 28, 2014

Annnnnd...We're Back!


I’m bringing A House on Garland back to life. I miss it.

Since I last saw you, the husband and I have had a child (if you look at the dates, you might notice that I stopped posting approximately eleven months ago...just before the nausea and complete exhaustion hit). Charlie is almost two months old and pretty great. Is it unreasonable to think I’ll be able to keep up with projects, photos, and posts with a new, tiny human in my life? Probably. 

I'm going to try anyway.


Welcome back to A House on Garland. There's someone new here for you to meet. 

Friday, July 26, 2013

Strawberry Jam Giveaway Winner!


I'm a bit late in posting the winner of the Strawberry Jam with Grand Marnier giveaway, but we have a winner! I used a random number generator and the winner is #3, Joe H. Joe said, "I let (unwillingly) the squirrels of my neighborhood eat all my strawberries," which means he doesn't often get to make jam. Congratulations, Joe! Thank you for reading and I hope you like the jam.

Look for more giveaways coming up! I hope to do at least one a month. 

Tuesday, July 9, 2013

Strawberry Jam with Grand Marnier and a GIVEAWAY!


Strawberry Preserves fresh out of the canning pot.
A couple of weeks ago, Ethan and I picked strawberries at a local farm, and I spent the week making preserves. It was nice to pull the jam pot out of the cupboard again. Our eighteen pounds of strawberries turned into the following in our kitchen: 1 quart strawberry vodka (currently infusing in our dining room closet), 3 ¼ pints Strawberry Jam with Grand Marnier, 3 ¾ pints Strawberry Balsamic Jam, 2 ¼ pints Strawberry Balsamic Glaze, 1 ½ pints Strawberry Jam with Mint. And we ate bunches of them fresh by the bowlful, of course.

Some of my favorite recipes from last year are Food in Jar’s Strawberry Vanilla Jam, Landry Etc’s Strawberry Preserves, and Strawberry Syrup (we use it to make soda and sweeten iced tea). This season I added some new flavors to the pantry and rotated out the Strawberry Vanilla Jam, but it will likely be back next season.

Strawberry Jam with Grand Marnier is my new favorite. I can’t taste the Grand Marnier specifically (there’s not a lot in the batch), but I can tell it’s there. It enhances the flavor of the strawberries like nothing else. The jam tastes like fresh, bright berries. I’m looking forward to eating it on toast, and layering it in oat bars.

I like to start batches of jam the day before I plan to can them by cutting the fruit and allowing it to macerate with some of the sugar overnight. The task seems more manageable when broken down, and I think the fruit cooks more quickly after the berries are allowed to sit around in some sugar for a day.

It’s been a couple of weeks since we picked berries and I’m ready for more. I didn’t make any syrup or whole preserved berries (we still have a few jars from last season, but I’m not sure they’ll be enough). This is a problem.

GIVEAWAY!
I hope you try this jam recipe, but if you’re not a jam maker or the kitchen is too hot for jam making, I’m giving away an 8oz jar. There are two ways to enter:
  1. Leave a comment on this blog post and tell me what you do with fresh-picked strawberries.
  2. Follow a house on garland (there’s a button on the sidebar over there) and leave a comment letting me know that you’re following the blog.
  3. Leave your comments by 11:59 p.m. on Wednesday, July 17. I will select the winner via random drawing and announce it on July 18.

Check the extended post for the recipe!


Saturday, June 29, 2013

Fence Succulent Garden


I love neon channel letters from old signs. I first saw bunches of them for sale at Farm Chicks in 2011, but didn’t know what I would spell or how to use them (and that was the year of everything wedding—the budget was occupied). It is a secret wish of mine to dedicate a full wall with a complete, mismatched channel letter alphabet, but alas that would require an available wall and a super good deal on letters. I saw them again last year with a plan in mind. I would buy the letters for “garden,” plant succulents in them, and hang them on our back fence. I bought the letters, but didn’t get everything planted that summer. Turns out I’m a slow mover. Determined to do better this year, I actually finished the project and am quite happy with the results.

I’ve been planting succulents in things (mostly old shoes) since I was in high school. I had one succulent shoe for about 15 years. Succulents are easy to grow (one of their best qualities) and are available in a variety of colors and shapes. Our back gets fence is full sun all the time, so it was the right spot for the fence garden. Succulents need well-draining soil, lots of sun, and little water.

Step one.

Find yourself some letters. I like the idea of spelling a common word, but initials or a family name could also be fun.

Step two.

Get those letters ready for planting.

The letters in their original state. 
Wash them. Scrub them. Remove any left over neon or clips. (I forgot to take a close-up “before” picture to show the insides in their full glory, but you can see from above that they were gross and needed stuff removed--the "a" still has all of its neon tubing).

I used pliers and wire cutters to remove the neon clips and the neon tubes. Then I used bleach water and a scrub brush to clean them and put silicone sealer around the seams where the bottoms of the letters meet the sides.

All cleaned up and ready to plant.
Two of my letters were rusty or had missing paint. To solve those problems, I repainted. The “r” needed a complete painting job; it was originally purple, and I chose to repaint in the same color. I liked the purple in the grouping. I also repainted the inside of the “d.” I taped the outside to protect the paint and used a khaki spray paint I found in the garage. That was a big step.

Step three.

Get the succulents ready.

Break apart tight clumps. I chose pretty standard Hens & Chicks for this; they’re not fancy, but they’re perennial. The roots should be 1 – 2” long. In doing research I read that the succulent cuttings should be allowed to dry out for a couple of days before replanting to encourage new rooting. I let some air out and others I just planted right away (which is what I’ve always done in the past). We’ll see how they last.

Step four.

Prepare for hanging. I used nails that fit into holes that were mostly already in the letters, placing them to line up so that when the letters are planted, I can just heft them up onto the nails. Note: make sure the fence is stable enough to hold the letters and nail into a cross bar on the fence, rather than just into fence boards. The boards won’t be strong enough on their own. When you like the arrangement (I forgot to take photos of this step, drat), take the letters down for planting.

Step five.

Plant, plant, plant.

Dirt.
Fill the letters with well-draining soil—sandy soil works well. Poke succulents into the dirt, packing them fairly close, but leaving a bit of room for more chicks to grow. 

Adding water to the d. 
Give them a bit of water for the roots to start taking hold. Leave the letters horizontal for a 1 – 2 weeks to allow the roots to take. (It would be a shame to hang them right away only to have all of the plants fall to the ground).

Finished!
Step six.

Hang your letters. Some of our succulents have gone craze and are blooming--they especially like the N. The letters were hanging for a few days before I planted them and we liked the look of the empty letters on the fence, but with the planting there is less contrast between the letters and the garden around them; they blend without losing their funk. They belong.  

Were have you planted succulents in unexpected places?


Related Posts Plugin for WordPress, Blogger...