Saturday, May 25, 2013

Yes, this is a Post about Cleaning Floors


Confession: I hate mopping floors. Among chores of the household variety, mopping and cleaning the bathtub are probably the ones I put off most. (I don’t really love doing dishes, either, if I’m telling the whole truth). I do love the way floors look and feel post-cleaning; I just don’t like the cleaning itself. I don’t mind vacuuming, cleaning the rest of the bathroom, or doing laundry. 
On my list this week was mopping all of the floors: kitchen, bathroom, and hardwood. Our house has beautiful hardwood floors—the most beautiful I’ve ever seen, in fact. The boards are over three inches wide, some are nearly twenty feet long, and they have chamfered edges. They are lovely. When I moved in, the house had wall-to-wall carpeting covering (and likely protecting—thanks, old lady who used to live here!) the wood. Before doing anything else, my dad and I ripped up the stained, nasty carpet and threw it in the dump pile. (For someone who doesn’t mind vacuuming, I don’t have that much carpet—herein lies the problem). 
A dog, cat, and two people make for a lot of dirt. I mop the kitchen floor fairly often, but I don’t get to the hard wood nearly as much, partly because I hate mopping, partly because the floors hide most dirt. (I sweep and vacuum the hardwood frequently—we don’t walk through the house with Pigpen-like trails of dirt following us). It was beyond time to mop the floors, to CLEAN the floors this week. 
The difficulty of cleaning hardwood floors without damaging them is all in what you use for cleaning and making sure you don’t get the floors too wet. Our floors are old and haven’t been refinished, making care even more important. 
To clean the floor, I used cider vinegar and water, according to the following ratio: 
1 cup cider vinegar
2 gallons water
Wring the mop out so that it is more damp than saturated—you don’t want water to sit on the floor for very long. Vinegar is a miracle cleaner, diluted with water, it is mild enough for the wood, but is still able to clean like nothing else.
After cleaning, I mixed up a recipe for natural floor polish that wouldn’t build up on the floor, and also wasn’t full of chemicals. 
½ cup olive oil
4 T cider vinegar
6 T vodka
Place everything in a spray bottle, shake it up, spray onto the floor, and buff with a dry mop cloth. The olive oil adds some shine (just a little; it doesn’t make everything slippery), the vinegar cleans (again), and the vodka helps the moisture evaporate quickly. 
I read many recipes for cleaner and polish that added essential oils to mask the vinegar. I chose not to use any because essential oils can be toxic to pets, especially cats. They walk on the floor, lick their paws, and bad things happen. Simple cleaners are often better for everyone. 
I’m still not a fan of mopping floors, but I do love the way the floors look and feel. I think the floors like it too. 


Sunday, May 19, 2013

Knit Bibs


I am one of those people who makes the majority of the gifts she gives. Hopefully this practice doesn’t strike fear into the hearts of my family and friends. There is a chance they think “oh no, not another handmade present” when I arrive at a party. So far no one has mentioned it, so I’m going to keep up the practice until I learn otherwise.

This shall be the summer of baby showers for friends—friends having first children, long-awaited children, and second and third children. Lately I’ve been knitting baby gifts--I love the texture and comfort of soft cotton for babies. Even better are gifts that are both cute and serve a practical purpose. These bibs are the perfect project—they don’t take long to knit and the pattern is versatile. I’ve added more stripes to the pattern and buttons to the straps to make the bib able to grow with the baby.


Striped Bib Pattern

It is important to use 100% cotton yarn for these. Cotton is more absorbent than acrylic, washes really well, and feels better against the skin (for both the baby and the knitter). The color may fade over time, but that will add to the charm of the bibs—these are meant to be used and used often. 

Be bold with colors. Have fun. Bibs should be fun.

Materials
-  cotton, worsted-weight yarn in two colors
-  size 6 or 7 needles (whichever I have available at the time)
-  5/8” wide button (I like to use a contrasting color)
-  embroidery floss
-  tapestry needle
-  scissors

Method
Gauge doesn’t really matter for this project.

  • Cast on (CO) 45 stitches.
  • Knit all rows until you have 6 or 8 garter ridges (that’s 12-16 rows of knitting).
  • Cut the yarn (or carry the color up the side of your knitting). Add the second color and knit until     you’re happy with the stripe width (I generally like the stripe to be at least 1 ½” wide), then cut the yarn and start again with the first color.
  • Knit until you have 32-36 total garter stitch ridges (64-72 knit rows).
  • Next row (to begin the straps): Knit 10 stitches, Bind Off (BO) the next 15, Knit 10.
  • Keep the first 10 stitches on your needle, we’ll get to those later. Knit the last 10 stitches until your strap is 6 inches long, or even a bit longer. Bind off.
  • With the other 10 stitches on your needle, knit until it is approximately 1” shorter than the first strap.
  • To make a buttonhole: Knit 4, BO 2, Knit 4.
  • Next row: Knit 4, CO 2, Knit 4.
  • Continue knitting all rows until the strap is the same length as the first. Bind off. Weave in ends.
  • Add a button to the strap opposite the buttonhole.

Happy knitting!


Sunday, May 12, 2013

On the Interwebs, first edition


Here are a few things I've seen on the Interwebs lately that I think are super great.

Kim Westad is one of my favorite potters on Etsy. I have been collecting her pieces one at a time for several years (mostly from her sale items). Her work is not inexpensive, but it is immaculate. She has an eye for texture and pattern that is rare. I love the clean color of this blue bowl.

All of the fixings for a pie picnic? Yes, please. Anthropologie has Pie Picnic Kits that include one-slice boxes, parchment paper, string, and disposable wooded forks. While such a kit is likely completely unnecessary, it is adorable. I see a pie picnic in my future.

One Sheepish Girl is a great blog. She has fun ideas, beautiful photography, and plays with yarn in really fun ways. This week she posted a tutorial for making this yarn wall background she made for a yarn party. I think it would be great for any party--baby shower, wedding shower, or birthday. I'd put it up as a backdrop for a cake table.

Baked goods always call to me, even pictures of baked goods are enticing. Cream Cheese Pound Cake from Orangette. I don't think I need to say anything more about that.

UPDATE: The Cream Cheese Pound Cake has been sampled. It passed all tests. De. lic. ious.

Monday, May 6, 2013

Garden Plans.

tomato and basil starts

Can you tell finals week is just around the corner? Blog posts have been set aside for grading papers, planning final class sessions, and wrapping up the semester’s work. The sunshine and garden have been distracting, and while I won’t have the time do everything I'd like for a few more weeks, I’ve been satisfying my urges by planning the garden and caring for seedlings.

Here’s what will be growing in our garden this year.
Perennials already doing their business:
Rosemary
Rhubarb
mint
Oregano
sage
chives
horseradish

Started from seed:
tomatoes:
Moscovich
German Johnson
German Lunchbox
Mortgage Lifter
Giant Pink Belgian
Big Rainbow
Heirloom Rainbow mix (these will be a surprise)
Amish Paste

Jalapenos
Greek Peperoncini
Italian Peperoncini
Banana Pepper
Cucumber           
Dill
Basil
Lemon Basil
Amish Pie Pumpkin
Sugar Pie Pumpkin

Cone Flower
Pinwheel Color Zinnia
White Zinnia

Direct Sow:
Peas
Purple Pole Beans
Soy beans
Danvers Carrots
lettuce mix
spinach
Garlic
parsley
cilantro
Sunflowers

Yet to purchase:
potatoes (Yukon gold and red)
onions (red and yellow)
Brussels sprouts
butternut squash
thyme

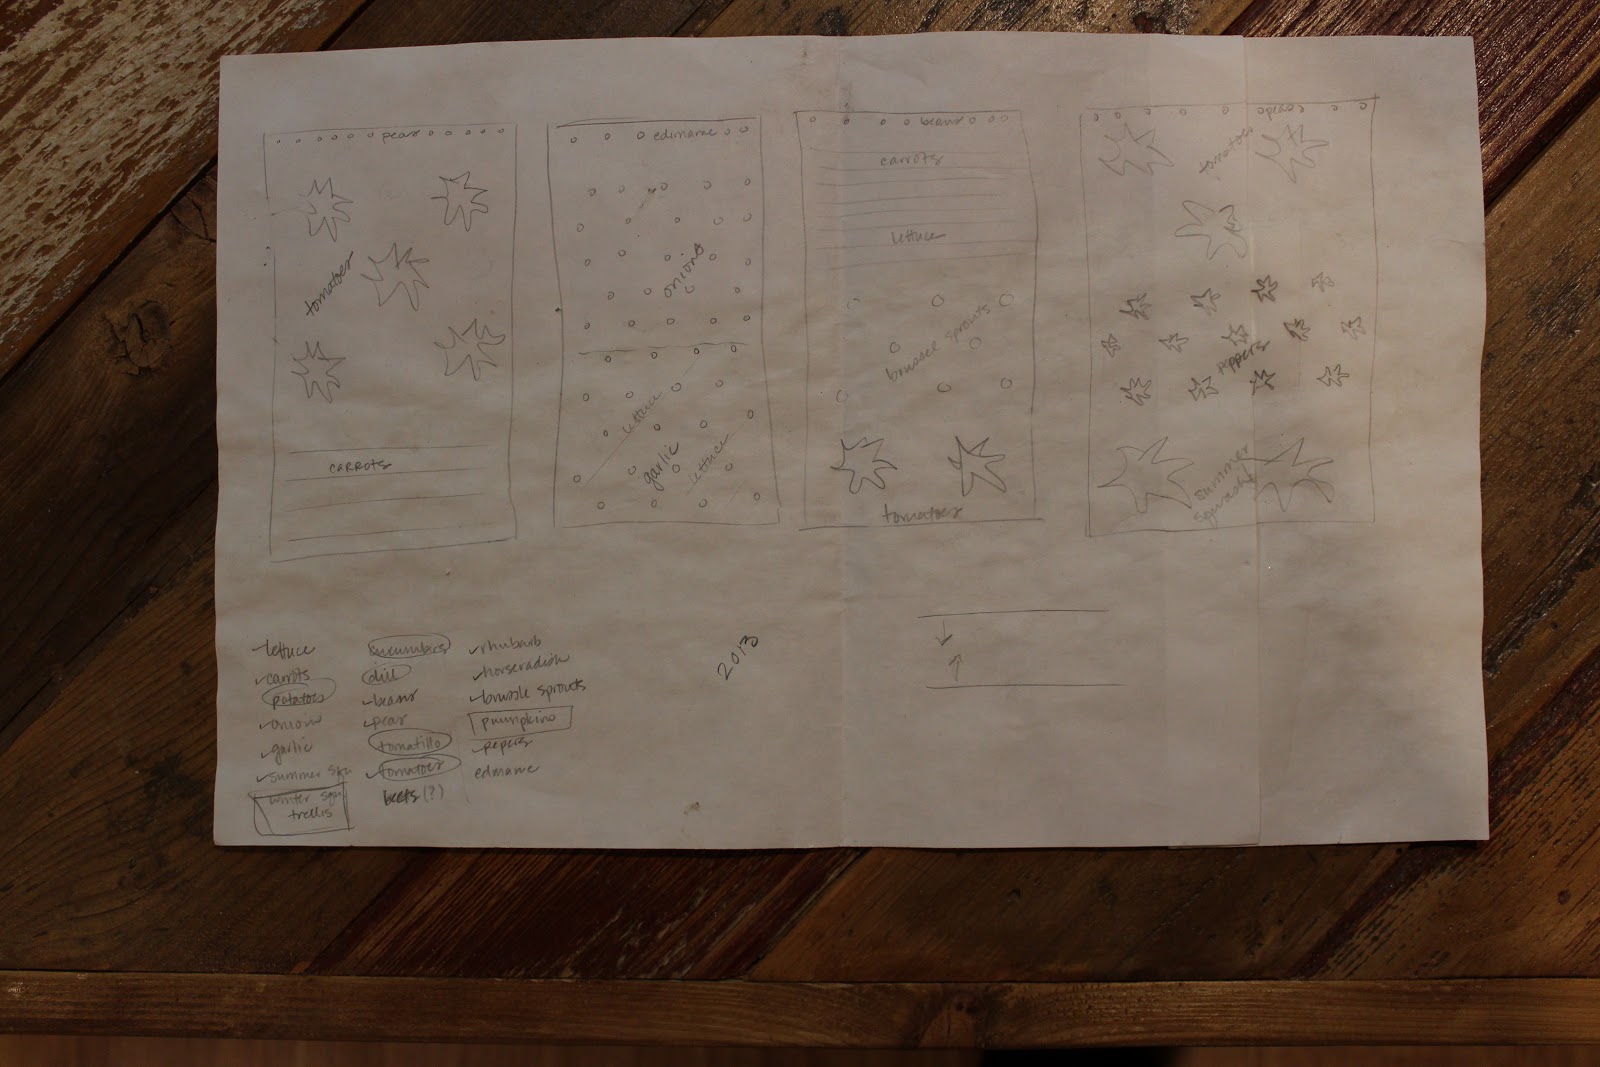
raised bed map, 2013

I do love planning the garden. It is calming during the stress of the term. Every year I make a quick drawing, planning out companion planting and crop rotations. I keep the plans in a file so I can refer to them while planning the next. This one already has some good dirt smudges on it--always a good sign of a well used garden plan. 

Our dirt is almost ready, and we have a new drip watering system (more on that later). I'm ready for a season of growing and harvesting as much as possible from our small yard. 

What are you planting this year? I’m always looking for new ideas.

Monday, April 29, 2013

Off the Shelf, April 2013


These are the books I have taken off of various bookshelves during the month. The current plan is to write up some book notes toward the end of every month. I'd love any book recommendations you havejust leave a comment.
The Thirteenth Tale by Diane Sutterfield. I’m not quite done with this one yet, and it was last month’s book group selection (shameful, I know), but it’s good so far. A mysterious and an intriguing novel, it is a story about writers and storytelling (which I always love). My book group had a good discussion and it seemed the book was enjoyed pretty universally (I was trying not to listen too intently as I had only read the first 60 pages at that point). I’ll add to my review when I finish it in the next couple of weeks. 
Is Everyone Hanging Out Without Me? by Mindy Kaling. Kaling’s book is this month’s book group selection. Kaling is a comedy writer (most know her as Kelly Kapoor in The Office and by her new show, The Mindy Project which is in its first season this year). There are truly funny moments in the book that made me chuckle out loud. It would be a great, easy summer read. Kaling writes about growing up with a charm and quirkiness that I admire. The charm was somewhat lost for me as she writes about her eventual success as a comedy writer. The second half of the book is a bit scattered, but it is worth a read, especially if you’re in the mood for light and witty. Kaling makes a lot of lists in the book, and I do love a good list, but toward the end some of her lists feel like a stretch; they don’t fit in as seamlessly as the writing in the early chapters. 
Real Fast Food by Nigel Slater. I’ve been reading and cooking from Nigel Slater’s book for a couple of months now, and I am a bit in love. I foresee making space for more of Slater’s cookbooks on our shelves. I’m on a mission to diversify the food we eat; I tend to make the same food over and over and I need to be more creative. Slater’s Real Fast Food is helping; the meals are easy, use few ingredients, and don’t take a lot of prep time--perfect for making after a long work day. I was introduced to Slater by The Wednesday Chef, who posted this recipe from the book. It is a favorite at our house. I also love his recipe for scrambled eggs with a white wine reduction: breakfast just got classy in our house. (That’s Classy with a capitol c. My dad left us some Refreshing White in a box of Franzia after a recent visit. I used that for the eggs instead of opening a bottle. Classy, I tell you. I'm sure Slater would not quite approve of the wine choice). 
The Lifespan of a Fact by John D’Agata and Jim Fingal. John D’Agata is breathing life into the literary essay, fighting for the essay as a current and relevant genre. He teaches nonfiction writing at the University of Iowa, a nationally renowned writing program. D’Agata wrote an essay that was rejected by the publication which commissioned the piece because it was deemed too fictional. Another publication picked the essay up and gave Fingal, an intern for the publisher, the job of fact-checking the entire piece. The Lifespan of a Fact is the product of that project. D’Agata’s essay is published in the center of the book’s pages, surrounded by notes and correspondence written by Fingal. The notes are color coded based on whether or not D’Agata’s statements were verified; source references and D’Agata's responses to Fingal's work are included, creating a full conversation with the essay itself. The resulting text explores how far facts might be stretched before creative license moves non-fiction writing too close to fiction writing. I’ll be using the text in my literary essay writing class in the fall.  
The Weed that Strings the Hangman’s Bag by Alan Bradley. I am a mystery novel junkie. Books are my crack, and mystery novels are the best kind of crack. I actually haven’t read enough of them in the last couple of years. I’m trying to remedy that. Alan Bradley’s Flavia de Luce series is my newest discovery. I quite love the character Bradley has created in this chemistry-mad eleven-year-old. I have a fondness for spunky girl detectives, especially those who works to find their own spaces in the world. The series begins with The Sweetness at the Bottom of the Pie, set in the English countryside around 1950. The Weed that Strings the Hangman’s Bag is the second in the series. This book wasn’t quite as endearing as the first, but it’s a series I will continue to follow. Flavia is a kick and in this novel, the character of Grace Ingleby is heartbreakingly lonely; Bradley writes characters well. 
What are you reading?


Saturday, April 27, 2013

Public Knitting

We were both starting new projects today. Mine is the Honey Cowl; Gretchen's is a baby hat. 

For the last six months or so, my friend Gretchen and I have been making a point to meet each other for coffee and knitting once a month. We’re both consistently busy with work and life, but we take the time out to meet at one of our favorite local cafes.
I have grown to love these dates. Two hours a month is an extremely manageable commitment with no pressure attached, but it manages to hold both of us accountable for our craft. Even in the busiest of months, we’ve made progress on our projects; we share patterns, yarn stories, and have the time to do nothing but sit, breathe, and be in good company with yarn and knitting needles. 
I function much more calmly with busy, productive hands, but I get behind, decide I don’t like something I’ve started, and put it aside in frustration. Gretchen dates help me push through those moments. There is a satisfaction in someone else noticing your progress. Accountability. Support. Encouragement. Working in community provides all of this.
There is also something quite wonderful about working on creative projects in public spaces. I’m seeing this trend more and more, and it makes me happy. The art of handmade is making a comeback and gaining momentum; it has become trendy to make from scratch, to repurpose, and to reinvigorate classic domestic arts. Knitting (or working on similar projects) in public spaces allows others to see how the craft is done. People ask questions and notice what is being created. 
Gretchen and I get lost in conversation and stitches during our knitting sessions; every time we’ve been at the café, a barista has had to come over and tell us there’s no hurry, but that they’re closing. We finish our respective rows, pack up, and promise meet again the next month. It works for us. 
What have you seen people work on in public? Is it as inspiring as I think it should be? 

Wednesday, April 24, 2013

Rhubarb Syrup


This week Ethan and I are weeding and adding compost to our garden spaces, planning the garden, and enjoying the sunny, cool evenings. In the last two weeks our rhubarb plants have gone from barely poking out of the ground to being nearly two feet in diameter. Spring, she is here. 

Before I go on, I have a confession: I am not the greatest rhubarb lover the world has seen. I prefer rhubarb mixed with other flavors. My dad will cut a stalk of rhubarb from the plant and take bites. Raw. Without sugar. I’m did not inherit that gene. I have come to appreciate rhubarb more as an adult, but I still like rhubarb mixed with another fruit or vegetables. Strawberry-rhubarb anything? Yes, please. Rhubarb chutney? Indeed. Rhubarb Jelly Barbeque sauce? Sounds great. 

I canned a lot of fruit syrups last year. I’ve become a fan of making drinks at home with club soda and homemade fruit syrups. I don’t drink a lot of soda, but I do enjoy one occasionally (especially in the summer). Flavoring my own made sense. No artificial anything or extra preservatives, just fruit, sugar, and carbonated water. (We have a soda maker now; I highly recommend one if you’re inclined to purchase club soda often. There is less waste and you can make the soda water as you need it. We love ours). 

Rhubarb with citrus and vanilla was one of the syrups I canned last summer and am still using now. (I like to can syrups in Weck juice jars. They are easier to pour from and they’re pretty—I’m a sucker for pretty jars).

Making your own flavored syrups doesn’t require much effort, makes for a MUCH healthier drink, and opens up a world of creative flavors that are unmatched by processed canned sodas. Rhubarb syrup is delicious. Put this recipe on your rhubarb list when it’s ready for harvest. 

I based my recipe on several I researched, sticking to a simple ratio of rhubarb to sugar and adding my own supplementary flavors.

Rhubarb Syrup and a soda. Delicious.

Rhubarb Syrup with Citrus and Vanilla

makes approximately 4 cups

1 ½ pounds rhubarb, chopped
3 cups water
zest of 1 lemon
zest and juice of 1 orange
½ vanilla bean, scraped
2 ½ cups sugar

This recipe can easily be made and stored in the refrigerator for immediate use, but is also safe for canning, which is what I did. Refrigerator space is precious around here.

Combine the rhubarb, water, lemon zest, orange zest, and vanilla bean in a non-reactive pot and bring to a boil. 

Reduce heat and allow to simmer for about 10-15 minutes, or until the rhubarb is soft and has given most of its color.

Place a fine-mesh sieve over a bowl and strain the rhubarb juice—this should take about 30 minutes. Pressing the rhubarb in the sieve will make for cloudy syrup, so just let gravity to the job for you and take a break or get your canning pot ready while the juice drips through the sieve.

To can, fill your canning pot with your jars and cold water and bring to a boil. When the pot has reached a boil, turn the temperature down and simmer for 10 minutes or until you’re ready to fill the jars. Place the lids in a small saucepan and bring to a low simmer to soften the seal.

When the juice has strained, compost or discard the rhubarb solids and zest and place the juice back in the pot along with the juice of the orange (strained to remove pulp) and the sugar. Bring to a boil and simmer for 10-15 minutes until the syrup has thickened slightly.

Remove the jars from the canning pot. Fill with the syrup, leaving a full ½” headspace. Wipe rims, apply lids, and screw on bands. Process in a boiling water canner for 10 minutes (15 minutes for Spokane due to elevation).

When the time is up, pull the canning pot off of the heat and let sit for 5 minutes, then remove the jars and allow them to cool on a towel-lined countertop. Check the seals and store in a cool, dark place.

To make soda:
Add approximately 2 tablespoons syrup to a glass of ice, top with club soda, stir, and drink. It really is surprising and refreshing. I’ve also combined the rhubarb with strawberry syrup or Satsuma syrup. The combinations are great. I don’t ever use much more than 2 tablespoons of syrup, but it is easy to adjust for taste. 

Related Posts Plugin for WordPress, Blogger...