Saturday, June 29, 2013

Fence Succulent Garden


I love neon channel letters from old signs. I first saw bunches of them for sale at Farm Chicks in 2011, but didn’t know what I would spell or how to use them (and that was the year of everything wedding—the budget was occupied). It is a secret wish of mine to dedicate a full wall with a complete, mismatched channel letter alphabet, but alas that would require an available wall and a super good deal on letters. I saw them again last year with a plan in mind. I would buy the letters for “garden,” plant succulents in them, and hang them on our back fence. I bought the letters, but didn’t get everything planted that summer. Turns out I’m a slow mover. Determined to do better this year, I actually finished the project and am quite happy with the results.

I’ve been planting succulents in things (mostly old shoes) since I was in high school. I had one succulent shoe for about 15 years. Succulents are easy to grow (one of their best qualities) and are available in a variety of colors and shapes. Our back gets fence is full sun all the time, so it was the right spot for the fence garden. Succulents need well-draining soil, lots of sun, and little water.

Step one.

Find yourself some letters. I like the idea of spelling a common word, but initials or a family name could also be fun.

Step two.

Get those letters ready for planting.

The letters in their original state. 
Wash them. Scrub them. Remove any left over neon or clips. (I forgot to take a close-up “before” picture to show the insides in their full glory, but you can see from above that they were gross and needed stuff removed--the "a" still has all of its neon tubing).

I used pliers and wire cutters to remove the neon clips and the neon tubes. Then I used bleach water and a scrub brush to clean them and put silicone sealer around the seams where the bottoms of the letters meet the sides.

All cleaned up and ready to plant.
Two of my letters were rusty or had missing paint. To solve those problems, I repainted. The “r” needed a complete painting job; it was originally purple, and I chose to repaint in the same color. I liked the purple in the grouping. I also repainted the inside of the “d.” I taped the outside to protect the paint and used a khaki spray paint I found in the garage. That was a big step.

Step three.

Get the succulents ready.

Break apart tight clumps. I chose pretty standard Hens & Chicks for this; they’re not fancy, but they’re perennial. The roots should be 1 – 2” long. In doing research I read that the succulent cuttings should be allowed to dry out for a couple of days before replanting to encourage new rooting. I let some air out and others I just planted right away (which is what I’ve always done in the past). We’ll see how they last.

Step four.

Prepare for hanging. I used nails that fit into holes that were mostly already in the letters, placing them to line up so that when the letters are planted, I can just heft them up onto the nails. Note: make sure the fence is stable enough to hold the letters and nail into a cross bar on the fence, rather than just into fence boards. The boards won’t be strong enough on their own. When you like the arrangement (I forgot to take photos of this step, drat), take the letters down for planting.

Step five.

Plant, plant, plant.

Dirt.
Fill the letters with well-draining soil—sandy soil works well. Poke succulents into the dirt, packing them fairly close, but leaving a bit of room for more chicks to grow. 

Adding water to the d. 
Give them a bit of water for the roots to start taking hold. Leave the letters horizontal for a 1 – 2 weeks to allow the roots to take. (It would be a shame to hang them right away only to have all of the plants fall to the ground).

Finished!
Step six.

Hang your letters. Some of our succulents have gone craze and are blooming--they especially like the N. The letters were hanging for a few days before I planted them and we liked the look of the empty letters on the fence, but with the planting there is less contrast between the letters and the garden around them; they blend without losing their funk. They belong.  

Were have you planted succulents in unexpected places?


Monday, June 24, 2013

Picking Strawberries


Strawberries are ready at some of the farms on Green Bluff in Spokane (and hopefully where you are as well). Strawberry season is one of my favorite points of summer. There is nothing quite like the goodness that comes from fresh, fully ripe berries. Grocery store berries are simply not the same—all pale on the inside and tasteless all over. Blech.

Ethan and I picked berries at Siemers' Farm this Sunday morning, continuing our tradition of picking berries on an early summer morning with a cup of coffee. It's one of my favorite days of summer. 

My tips for picking berries:
  1. Plan on picking after a couple of good sunny days. Sun is crucial for ripening and sweetening berries. If days have been gray during picking season, wait it out. Sunshine is necessary to develop the sugars in the berries.
  2. Check with the farm. Call or check their website. You want to go on a day when berries are ready. I’ve found that Green Bluff farmers are very good about updating messages on the Fresh on the Bluff page so that you know what is ripe when. We’ve lucked out two years in a row, picking in a field on its first open day. Berries dripping off the plants make for quick work.
  3. Get to the farm early. Strawberry season is a hot season, so picking in the cool of morning is MUCH more pleasant than a hot afternoon. Get yourself a coffee on the way if you need, bring water, and sunscreen for protection.
  4. Bring cash. Many farms don’t take credit cards because the fees for a small business can be steep (this is one way they keep prices down). Prevent frustration by bringing cash with you.
  5. Only pick the brightest, reddest, shiniest berries. Strawberries do not ripen any further after picking; so only choose those that look like storybook strawberries. (This is also crucial information for choosing berries in the store if you’re not picking them yourself). In the fields, farmers want you to pick only the ripe berries. They want you to get the best product, and they want the pickers who follow you to have ripe berries to add to their boxes later that week. If you pick under ripe berries, the ripe ones will likely rot on the plant and never be enjoyed—that’s not good for anyone.
  6. Along with #5, also be careful not to pick bruised, damaged, or moldy berries. These ones will just leak all over your good berries and reduce the already limited shelf life of the whole box.
  7. Move the plants around (gently) as you pick. There are often ripe, delicious berries toward the middle of the plant or hidden under leaves. You don’t want to miss them.
  8. Don’t dismiss the small red berries. Small berries are often the most flavorful, in fact.
  9. Plan your intake wisely. You want to only pick the berries you will use within two or three days of picking. If your berries are the ripest, red-through-the-middle berries, they won’t last much beyond three days after picking. (My 20 pounds this weekend was ambitious, but most of them have already been used or in the process of becoming jam—whew).
  10. Bring a friend. The peace of the fields is wonderful in the morning, but it’s nice to have a friend in a nearby row.
  11. Taste a berry or two in the field. Make sure they’re sweet and juicy. Don’t eat the farm out of business, but tasting is okay—and there’s nothing quite like tasting a couple of berries in the field on a dewy morning.

What fresh fruit are you picking this year? What do you plan on doing with it? These are things I need to know.

Coming soon: A post about what I did with 20 pounds of strawberries (other than grabbing handfuls from the boxes, rinsing them under the tap and eating them a la carte).

Sunday, June 2, 2013

Off the Shelf, May 2013


The books I've picked up, turned the pages of, and thought about during the month.

Fever by Mary Beth Keane

For the second month in a row, I have finished my book group book a week ahead of time. This may be a record for me. Fever was good. The novel didn’t blow me away, but I enjoyed it thoroughly. Keane ‘s novel follows the (fictionalized) story of Typhoid Mary, the woman who was discovered to be an asymptomatic carrier of Typhoid Fever in New York at the turn of the 20th century, infecting people for whom she worked as a cook, but never showing signs of the illness herself. After reading the story, I have a difficult time referring to her as Typhoid Mary; it was likely a name she hated. The story is quite sympathetic toward Mallon (for good reason) without romanticizing her, which I appreciated. So much of her story is heartbreaking because of the lack of knowledge about disease and medicine—Mary Mallon was unusual and few people, let alone a working cook and those around her, understood what it meant that she could pass on a disease she never had herself. Keane wrote Mallon as a complex, emotional character; she exhibits pain and anger along with love and kindness, often all at once. Keane’s novel made me want to know more about the non-fiction Mary Mallon; it made me wonder how much we know about Mallon’s life and if we have access to her correspondence, but then, I’m a giant nerd who loves that stuff. I would read more by Keane.

Film: a Very Short Introduction by Michael Wood

I’m teaching a film class in July. I ordered books for the course last week and am in the process of research for planning classes. I will be reading more film books in the next two months. I did not end up ordering this one (which I might regret, this is a good little book). I think the Very Short Introduction series by Oxford University Press is pretty fabulous. They are smart, (very) short, and $10. There are 183 books in the series. Browse. Learn stuff. 

Mason Dixon Knitting by Kay Gardiner and Ann Shayne

I don’t own many knitting books (only three, I think) but I find myself picking this one up pretty often. A friend recommended it and I have found myself knitting several of the projects, some regularly. I like the authors’ sense of humor (one of the best project names: Absorba, the Great Bathmat) and they don’t shy away from mentioning mistakes or colors gone wrong. The projects range from beginner to more advanced and cover everything from dishcloths and baby blankets to curtains and nighties. So far, I haven’t had any difficulty with instructions and have been happy with every project I’ve worked. Next up: Absorba, the Great Bathmat!

An update on The Thirteenth Tale by Diane Sutterfield from April: I finished the novel this month and I did enjoy the story. It’s not one I feel the need to read again, but it’s an intriguing mystery about storytelling, memory, and loss. I’m glad I finished it and recommend it. 

To be fair, I also read, commented on, and graded over 200 pages of student papers during the first half of May. I’m hoping to pull more books off the shelf in June. Many more. Sometimes I think my job teaching literature and writing is bad for my reading of literature and writing. 


Saturday, May 25, 2013

Yes, this is a Post about Cleaning Floors


Confession: I hate mopping floors. Among chores of the household variety, mopping and cleaning the bathtub are probably the ones I put off most. (I don’t really love doing dishes, either, if I’m telling the whole truth). I do love the way floors look and feel post-cleaning; I just don’t like the cleaning itself. I don’t mind vacuuming, cleaning the rest of the bathroom, or doing laundry. 
On my list this week was mopping all of the floors: kitchen, bathroom, and hardwood. Our house has beautiful hardwood floors—the most beautiful I’ve ever seen, in fact. The boards are over three inches wide, some are nearly twenty feet long, and they have chamfered edges. They are lovely. When I moved in, the house had wall-to-wall carpeting covering (and likely protecting—thanks, old lady who used to live here!) the wood. Before doing anything else, my dad and I ripped up the stained, nasty carpet and threw it in the dump pile. (For someone who doesn’t mind vacuuming, I don’t have that much carpet—herein lies the problem). 
A dog, cat, and two people make for a lot of dirt. I mop the kitchen floor fairly often, but I don’t get to the hard wood nearly as much, partly because I hate mopping, partly because the floors hide most dirt. (I sweep and vacuum the hardwood frequently—we don’t walk through the house with Pigpen-like trails of dirt following us). It was beyond time to mop the floors, to CLEAN the floors this week. 
The difficulty of cleaning hardwood floors without damaging them is all in what you use for cleaning and making sure you don’t get the floors too wet. Our floors are old and haven’t been refinished, making care even more important. 
To clean the floor, I used cider vinegar and water, according to the following ratio: 
1 cup cider vinegar
2 gallons water
Wring the mop out so that it is more damp than saturated—you don’t want water to sit on the floor for very long. Vinegar is a miracle cleaner, diluted with water, it is mild enough for the wood, but is still able to clean like nothing else.
After cleaning, I mixed up a recipe for natural floor polish that wouldn’t build up on the floor, and also wasn’t full of chemicals. 
½ cup olive oil
4 T cider vinegar
6 T vodka
Place everything in a spray bottle, shake it up, spray onto the floor, and buff with a dry mop cloth. The olive oil adds some shine (just a little; it doesn’t make everything slippery), the vinegar cleans (again), and the vodka helps the moisture evaporate quickly. 
I read many recipes for cleaner and polish that added essential oils to mask the vinegar. I chose not to use any because essential oils can be toxic to pets, especially cats. They walk on the floor, lick their paws, and bad things happen. Simple cleaners are often better for everyone. 
I’m still not a fan of mopping floors, but I do love the way the floors look and feel. I think the floors like it too. 


Sunday, May 19, 2013

Knit Bibs


I am one of those people who makes the majority of the gifts she gives. Hopefully this practice doesn’t strike fear into the hearts of my family and friends. There is a chance they think “oh no, not another handmade present” when I arrive at a party. So far no one has mentioned it, so I’m going to keep up the practice until I learn otherwise.

This shall be the summer of baby showers for friends—friends having first children, long-awaited children, and second and third children. Lately I’ve been knitting baby gifts--I love the texture and comfort of soft cotton for babies. Even better are gifts that are both cute and serve a practical purpose. These bibs are the perfect project—they don’t take long to knit and the pattern is versatile. I’ve added more stripes to the pattern and buttons to the straps to make the bib able to grow with the baby.


Striped Bib Pattern

It is important to use 100% cotton yarn for these. Cotton is more absorbent than acrylic, washes really well, and feels better against the skin (for both the baby and the knitter). The color may fade over time, but that will add to the charm of the bibs—these are meant to be used and used often. 

Be bold with colors. Have fun. Bibs should be fun.

Materials
-  cotton, worsted-weight yarn in two colors
-  size 6 or 7 needles (whichever I have available at the time)
-  5/8” wide button (I like to use a contrasting color)
-  embroidery floss
-  tapestry needle
-  scissors

Method
Gauge doesn’t really matter for this project.

  • Cast on (CO) 45 stitches.
  • Knit all rows until you have 6 or 8 garter ridges (that’s 12-16 rows of knitting).
  • Cut the yarn (or carry the color up the side of your knitting). Add the second color and knit until     you’re happy with the stripe width (I generally like the stripe to be at least 1 ½” wide), then cut the yarn and start again with the first color.
  • Knit until you have 32-36 total garter stitch ridges (64-72 knit rows).
  • Next row (to begin the straps): Knit 10 stitches, Bind Off (BO) the next 15, Knit 10.
  • Keep the first 10 stitches on your needle, we’ll get to those later. Knit the last 10 stitches until your strap is 6 inches long, or even a bit longer. Bind off.
  • With the other 10 stitches on your needle, knit until it is approximately 1” shorter than the first strap.
  • To make a buttonhole: Knit 4, BO 2, Knit 4.
  • Next row: Knit 4, CO 2, Knit 4.
  • Continue knitting all rows until the strap is the same length as the first. Bind off. Weave in ends.
  • Add a button to the strap opposite the buttonhole.

Happy knitting!


Sunday, May 12, 2013

On the Interwebs, first edition


Here are a few things I've seen on the Interwebs lately that I think are super great.

Kim Westad is one of my favorite potters on Etsy. I have been collecting her pieces one at a time for several years (mostly from her sale items). Her work is not inexpensive, but it is immaculate. She has an eye for texture and pattern that is rare. I love the clean color of this blue bowl.

All of the fixings for a pie picnic? Yes, please. Anthropologie has Pie Picnic Kits that include one-slice boxes, parchment paper, string, and disposable wooded forks. While such a kit is likely completely unnecessary, it is adorable. I see a pie picnic in my future.

One Sheepish Girl is a great blog. She has fun ideas, beautiful photography, and plays with yarn in really fun ways. This week she posted a tutorial for making this yarn wall background she made for a yarn party. I think it would be great for any party--baby shower, wedding shower, or birthday. I'd put it up as a backdrop for a cake table.

Baked goods always call to me, even pictures of baked goods are enticing. Cream Cheese Pound Cake from Orangette. I don't think I need to say anything more about that.

UPDATE: The Cream Cheese Pound Cake has been sampled. It passed all tests. De. lic. ious.

Monday, May 6, 2013

Garden Plans.

tomato and basil starts

Can you tell finals week is just around the corner? Blog posts have been set aside for grading papers, planning final class sessions, and wrapping up the semester’s work. The sunshine and garden have been distracting, and while I won’t have the time do everything I'd like for a few more weeks, I’ve been satisfying my urges by planning the garden and caring for seedlings.

Here’s what will be growing in our garden this year.
Perennials already doing their business:
Rosemary
Rhubarb
mint
Oregano
sage
chives
horseradish

Started from seed:
tomatoes:
Moscovich
German Johnson
German Lunchbox
Mortgage Lifter
Giant Pink Belgian
Big Rainbow
Heirloom Rainbow mix (these will be a surprise)
Amish Paste

Jalapenos
Greek Peperoncini
Italian Peperoncini
Banana Pepper
Cucumber           
Dill
Basil
Lemon Basil
Amish Pie Pumpkin
Sugar Pie Pumpkin

Cone Flower
Pinwheel Color Zinnia
White Zinnia

Direct Sow:
Peas
Purple Pole Beans
Soy beans
Danvers Carrots
lettuce mix
spinach
Garlic
parsley
cilantro
Sunflowers

Yet to purchase:
potatoes (Yukon gold and red)
onions (red and yellow)
Brussels sprouts
butternut squash
thyme

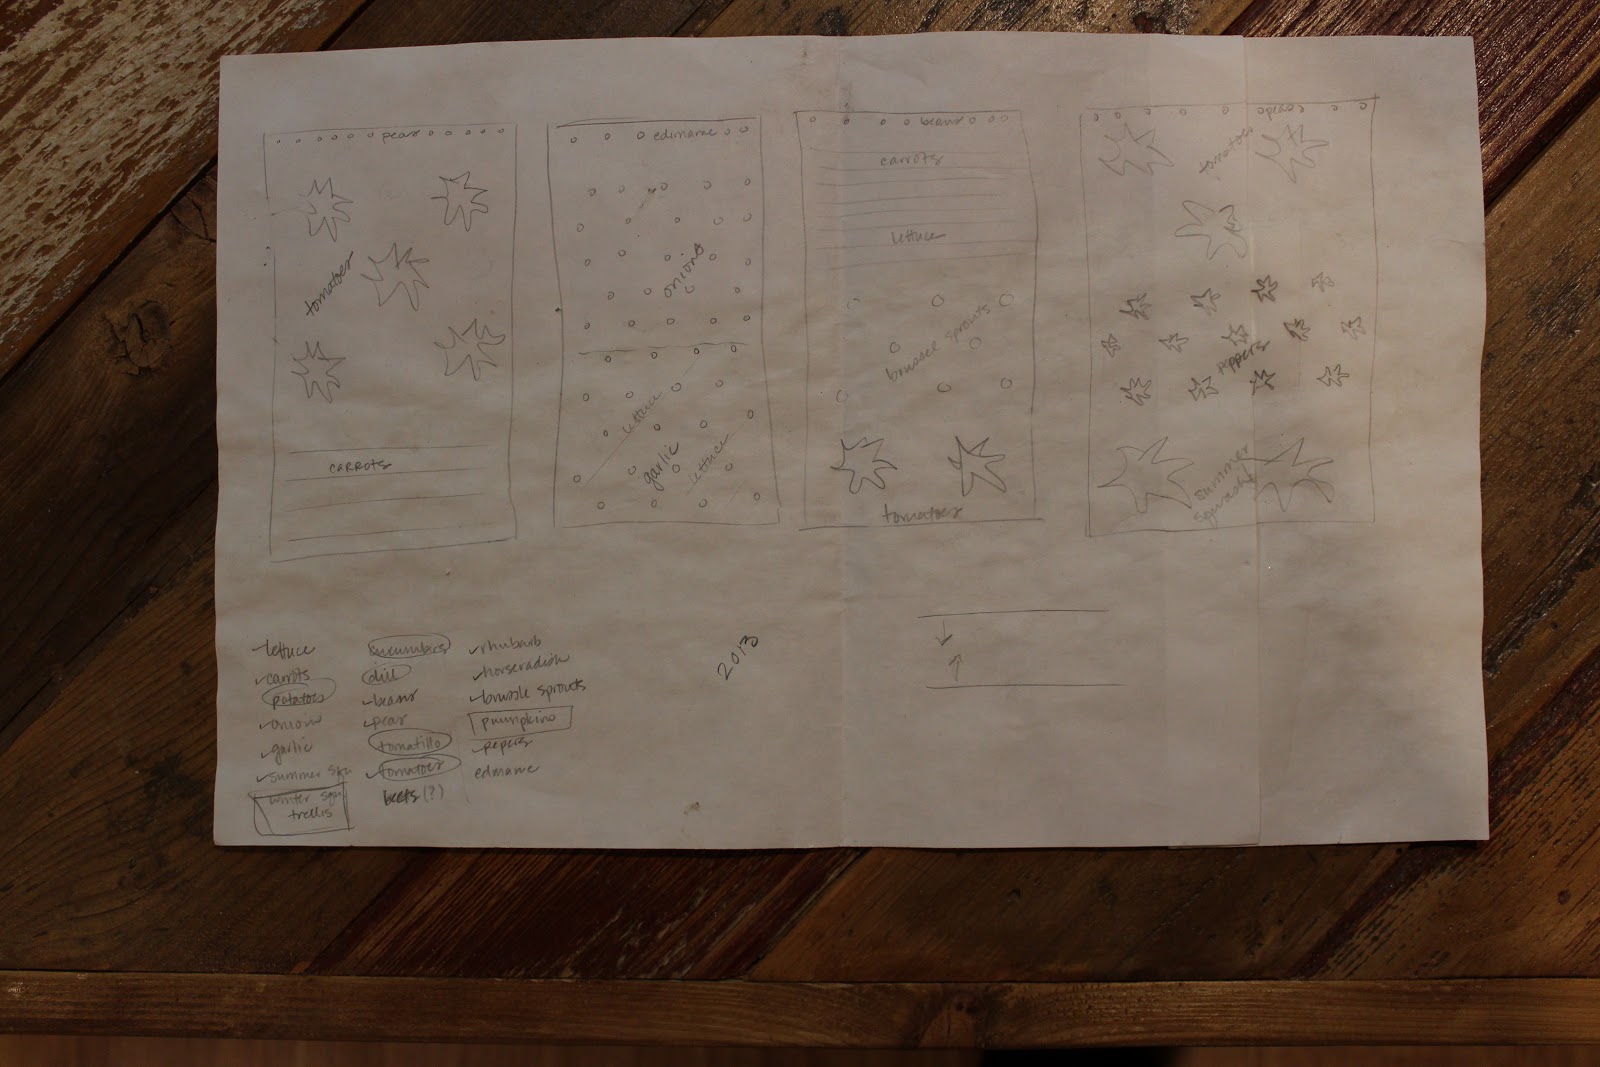
raised bed map, 2013

I do love planning the garden. It is calming during the stress of the term. Every year I make a quick drawing, planning out companion planting and crop rotations. I keep the plans in a file so I can refer to them while planning the next. This one already has some good dirt smudges on it--always a good sign of a well used garden plan. 

Our dirt is almost ready, and we have a new drip watering system (more on that later). I'm ready for a season of growing and harvesting as much as possible from our small yard. 

What are you planting this year? I’m always looking for new ideas.
Related Posts Plugin for WordPress, Blogger...